
Bubble Machine: Battery Interrupt
Why this Specific Machine:
It is $12 to 14 and comes in two colors, Pink and Orange.
The machine has 3 legs and each of the 2 back legs have a holes in them that fits a 3.5 female jack (the one that screws in) perfectly.
What You Need:


Battery Interrupter
Tin snips / file
A battery interrupter, I recommend the one that can screw into the toy.
Test The Toy…
Always test the toy before adapting it. There is nothing more frustrating than adapting a toy and it not working and because you did not test if first, you don’t know if its the adapting or the toy
Prepare the Female Jack:
Make sure to use this sort type of jack

Cut a Notch or Hole in the Battery Cover.

Using tin snips or a file to make a notch.
If you are using tin snips, the easiest way to create a notch is to cut a corner off. Or you can make 2 small cuts about 1/2 to a 1 centimeter apart and use pliers, or the top of your wire strippers, to bend the piece of plastic in between the cuts back and forth. You will have to bend it back several times until it snaps or you can use the tin snips to cut it when it’s bent. I used the second method for this toy.
Note: you want the notch to be big enough that the wires easily exit the battery compartment but enough that the copper plate does not come out.
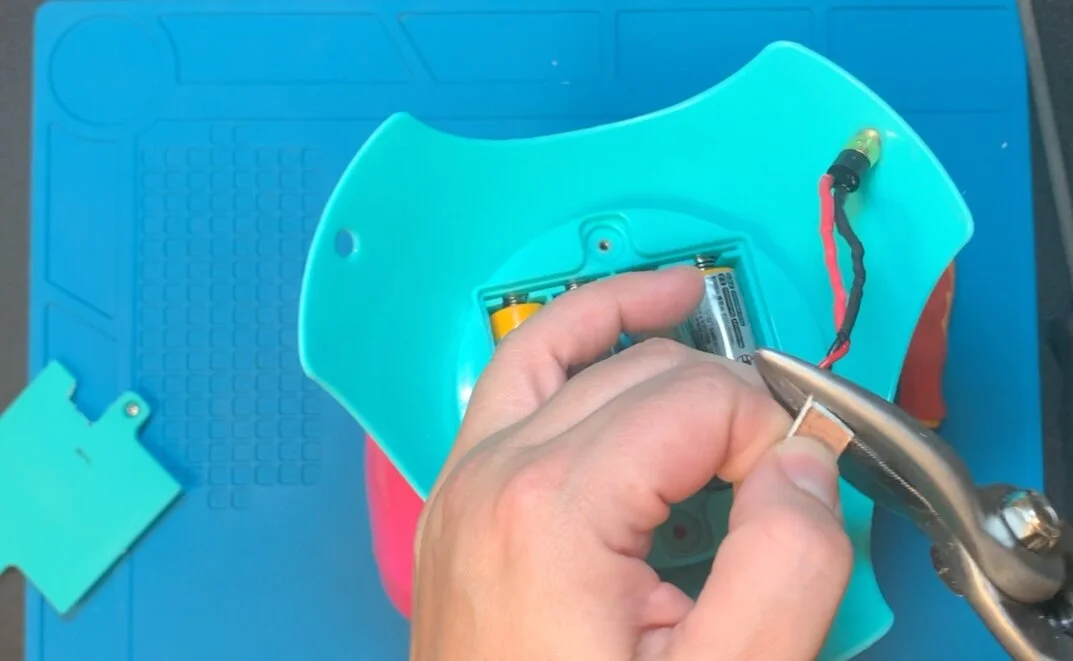
Place the Battery Interrupter

Place the battery interrupter in the battery compartment.
If you are using a thicker circuit board you are going to want to put the copper plate on the side of the battery with the spring. The reason is that with the thicker circuit board it can be difficult to fit the battery back into the battery compartment. By placing the copper plate on the side with the spring you can set it inside and then use the battery to push against the copper plate and spring allowing you to pop the battery into place.

Before re-screwing the battery lid on you want to check to see if the battery lid will fit with the battery interrupter. I just hold the inlace and see if it looks like its bowing at any place.
If it is bowing, you might need to cut down the copper plate especially if you are leaving the battery interrupter in this toy.

Place the Jack
Place the jack through the hole in one of the back legs.
I like to test it a this point just to make sure it is still working before closing everything up.
Test the Battery Interrupter
You are going to want to make sure that you turn the toy ON. If the toy is not ON then there is no circuit to be interrupted and your switch will not work! At this point if you plug in your switch and it’s not working, try hitting the ON/OFF button on the toy (or sliding it to the ON position). If it still doesn’t work try a different switch. Finally if that does not work, take a look at you battery interrupt and see if any wires are severed, or are touching that should not be touching. You should not need to try different batteries if you tested the toy before adding the battery interrupter.


Screw On The Battery Lid/Cover
Secure the Jack into Place
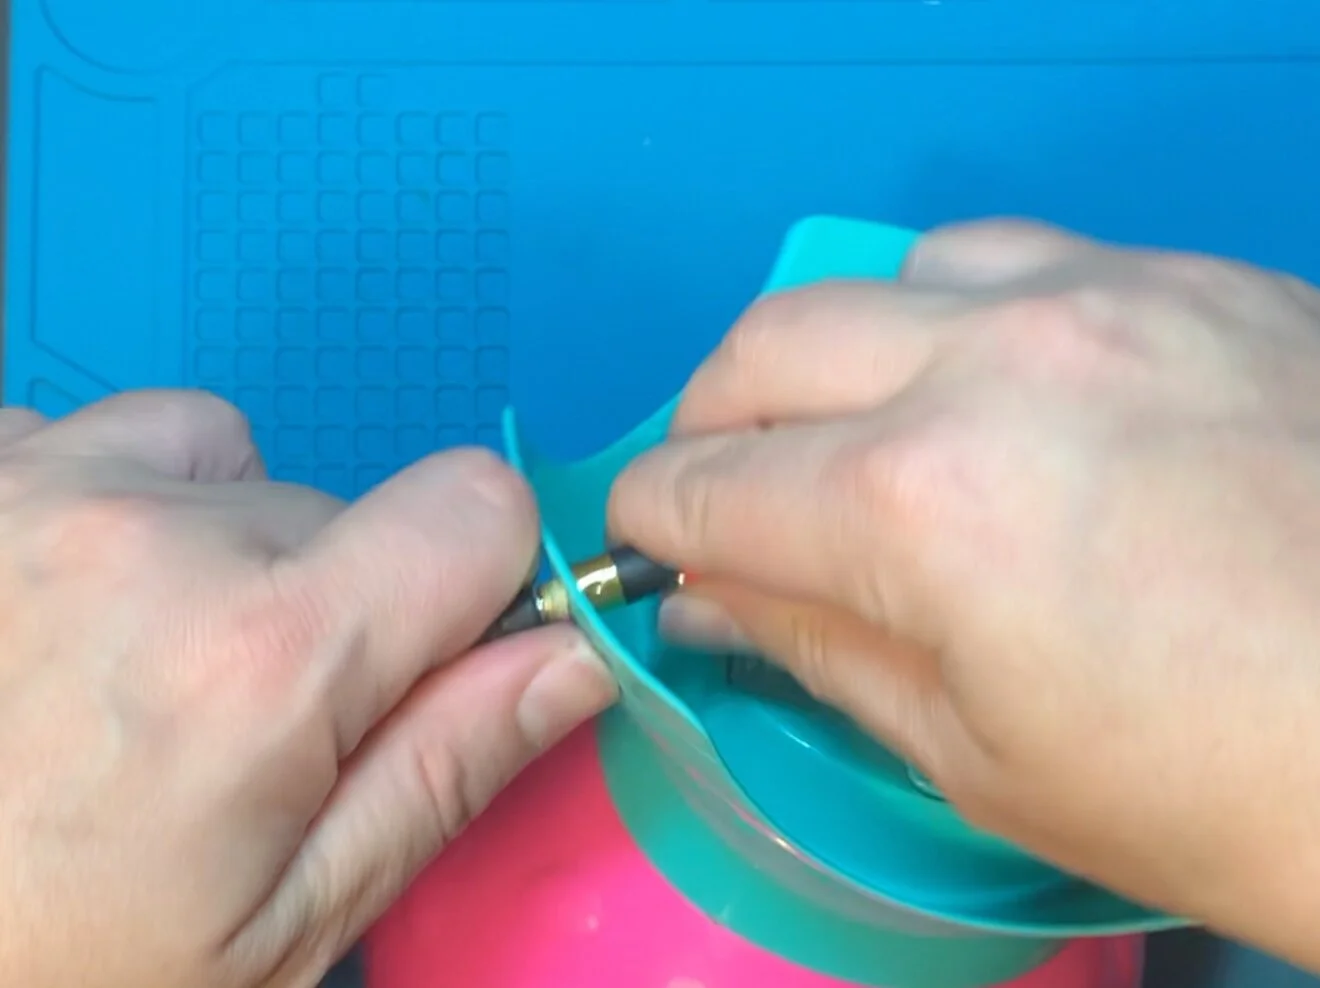
Unplug the switch. I like to have one hand on the male plug of the switch and on hand on the female jack of the battery interrupter
Make sure the female jack is all the way through the hole on the toy. Then twist on the metal piece that came with the jack as tight as you can by hand. Once you can no longer twist by hand, grab pliers or wire stripper to tighten it even more.
When doing any twisting I like to have one hand on the female jack making sure that I hold it in place tight against the toy to ensure I am spinning the metal piece and not the jack.


Your Toy Is Ready to Use
Important Note when Using A Battery Interrupter:
Before using the toy with a switch: Make sure that you turn the toy ON. If the toy is not ON then there is no circuit to be interrupted and your switch will not work!
Thus, in the event you plug your switch into the battery interrupter and it does not work try hitting the ON/OFF button on the toy (or sliding it to the ON position). If it still does not work try:
a different switch
checking the batteries
checking the battery interrupter itself
After using the toy with a switch: Make sure to turn the toy OFF, don’t just unplug the switch. If you do not turn the toy OFF you will drain the batteries very quickly. If you are not sure if the toy is OFF, plug in a switch and hit it. if the toy doesn’t work you are good to go. If the toy works, hit the OFF button on the toy and then hit the switch again, and make sure the toy does not work.