
What is a Switch?
We use switches all the time without even realizing. Any item with and on/off button is a switch. According to https://www.merriam-webster.com a switch is, “a device for making, breaking, or changing the connections in an electrical circuit.” In the simplest terms, a switch is the button or thing you use to make an electrical event happen. They turn things on and off. Switches are all over our homes: light switches, remote controls, blenders, hair dryers…
However, most of the switches that are built into products, specifically children’s toys, are relatively small and require significant fine motor capabilities to activate. Think about children’s toys; the button in a stuffed animal that makes a sound involves using your thumb and a finger to pinch the small surface of the button. Individuals with limited mobility or a physical disability may not have the fine motor control in order to use such switches. So what is the solution?
The solution is to switch adapt items so that they can be used with an adaptive switch, also known as a “specialty switch” or a “capability switch”. Honestly, in the world of Special Education they are often just called “switches,” which is what I call them. These adapted switches allow people with limited movement and fine motor control to use technology, play with toys, and access other electronic devices.
Common Types of Switches
There are many different kinds of switches, they differ in size, texture, shape, pressure, and activation methods. Below I list different types of switches. Most lists I have seen refer to them by the name of commercially available ones. I have attempted to group them by access method.
Mechanical/Tactile/Contact Switches – activated by physically pressing or grasping the switch with movement of a body part (e.g. hand/finger/head/foot/knee/elbow/cheek etc).
Commercially Available Ones: Jelly Bean, Buddy Button, Gumball, Pillow Switch, Specs Switch, Grasp Switch, Pinch switch, Thumb Switch, etc.
Many students benefit from the sensory feed back they receive upon activating them (e.g. the click sound they make or the tactile feedback from the physical act of activating them)
Touch/Low Touch Switches – require less force to activate but don’t offer a lot of sensory feedback.
Commercially Available One: Plate Switch
Sensor or Proximity Switches – are activated by the slight movement of a body part towards the switch or within a certain range in-front of it.
Commercially Available Ones: Candy Corn Switch, Eye Blink Sensor, Mini Beamer.
I have used this with students who could not hit switches with enough force to depress them but could move muscles in their arms when they want to activate a switch.
Sip/Puff Switches – are activated with the mouth, using a sip and/or a puff action.
Voice/Sound Switches – are activated by sound or voice.
Commercially Available One: Clapper (think 90’s informercial) or for those who never heard of that think Alexa paired with a smart outlet
There are many factors that go into figuring out what kind of switch is best for a person.
Switch Access Point, Positioning, and Mounting
Switch Access is the means in which the person accesses/activates the switch.
Positioning and Mounting a Switch refers to where, how, and on what surface a switch is located. These elements allow a person to more easily activate the switch.
Examples: Putting the switch board on a person’s wheelchair tray or near their elbow.
In my experience, determining appropriate switch access and positioning is best done when it includes the whole team, including the Occupational Therapist, Physical Therapist, Speech Therapist, teachers, and person using it.
Electric Circuits
An electric circuit is the path for transmitting electric current. For the devices you will encounter on this website, it consists of the power source (usually the batteries), the toy, and the connecting wires.
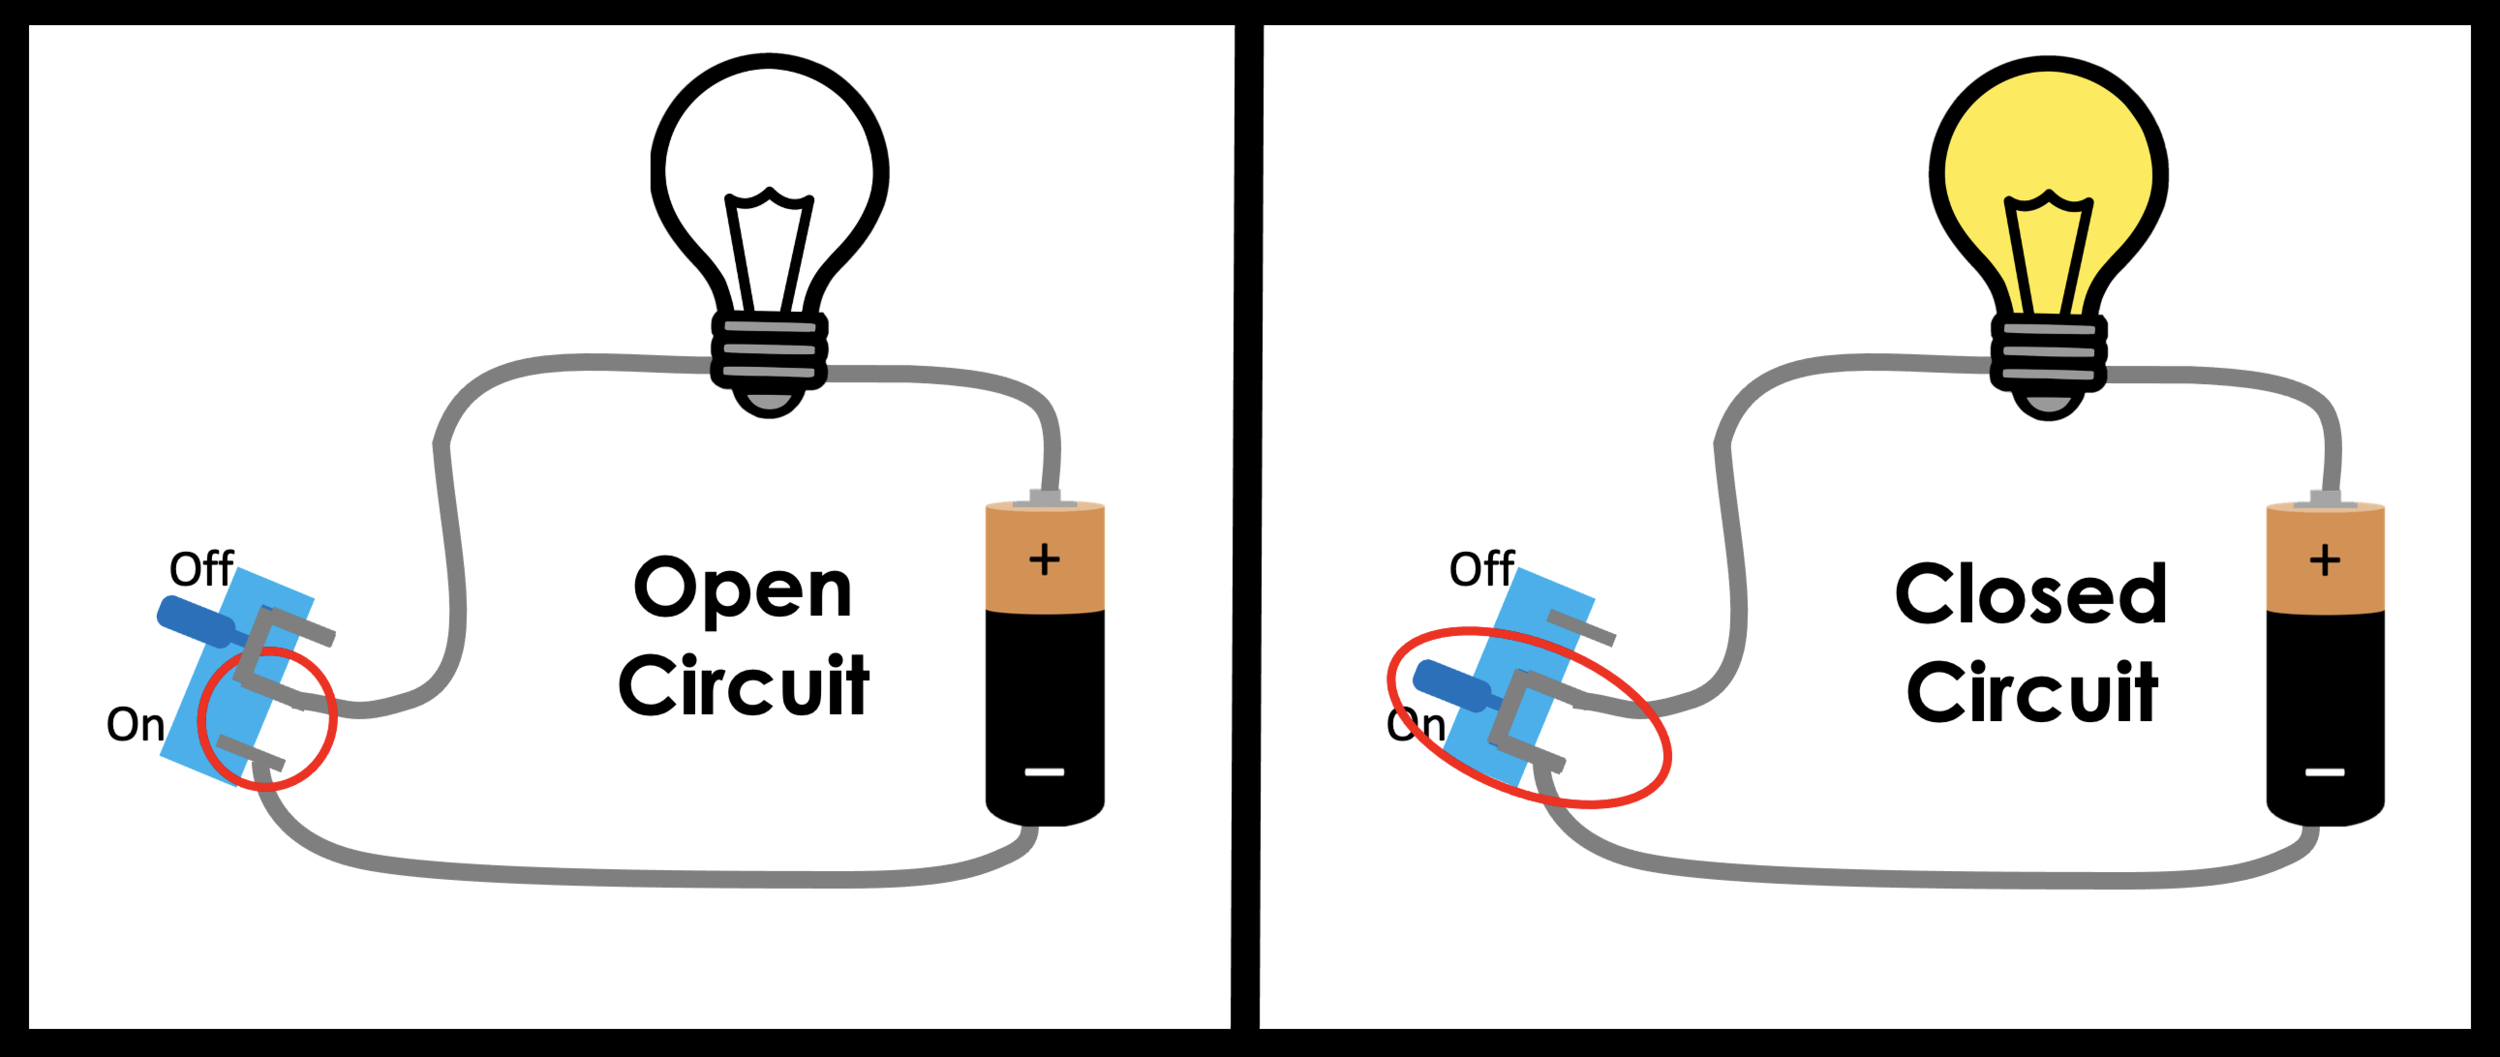
In the Open Circuit, the switch is turned off. In the diagram above, the blue rectangle represents a sliding on/off switch. The blue on/off switch has a metal “T” shape coming out of it. In the open circuit, the “T” shape is connecting 2 pins, one pin that is connected to the light bulb and the other that is currently connected to nothing.
In the Closed Circuit, the sliding on/off switch is also connecting two pins, one pin that is connected to the “negative” side of the battery, and the other pin that is connected to the light bulb. When you slide the switch to the on position, the metal of the “T” shape touches both sides of the metal and closes the circuit.
Electric Circuits With a Switch
By attaching the wires of the female jack to the same pins as the toy’s original switch, you can turn the toy on using the "Capability Switch.”
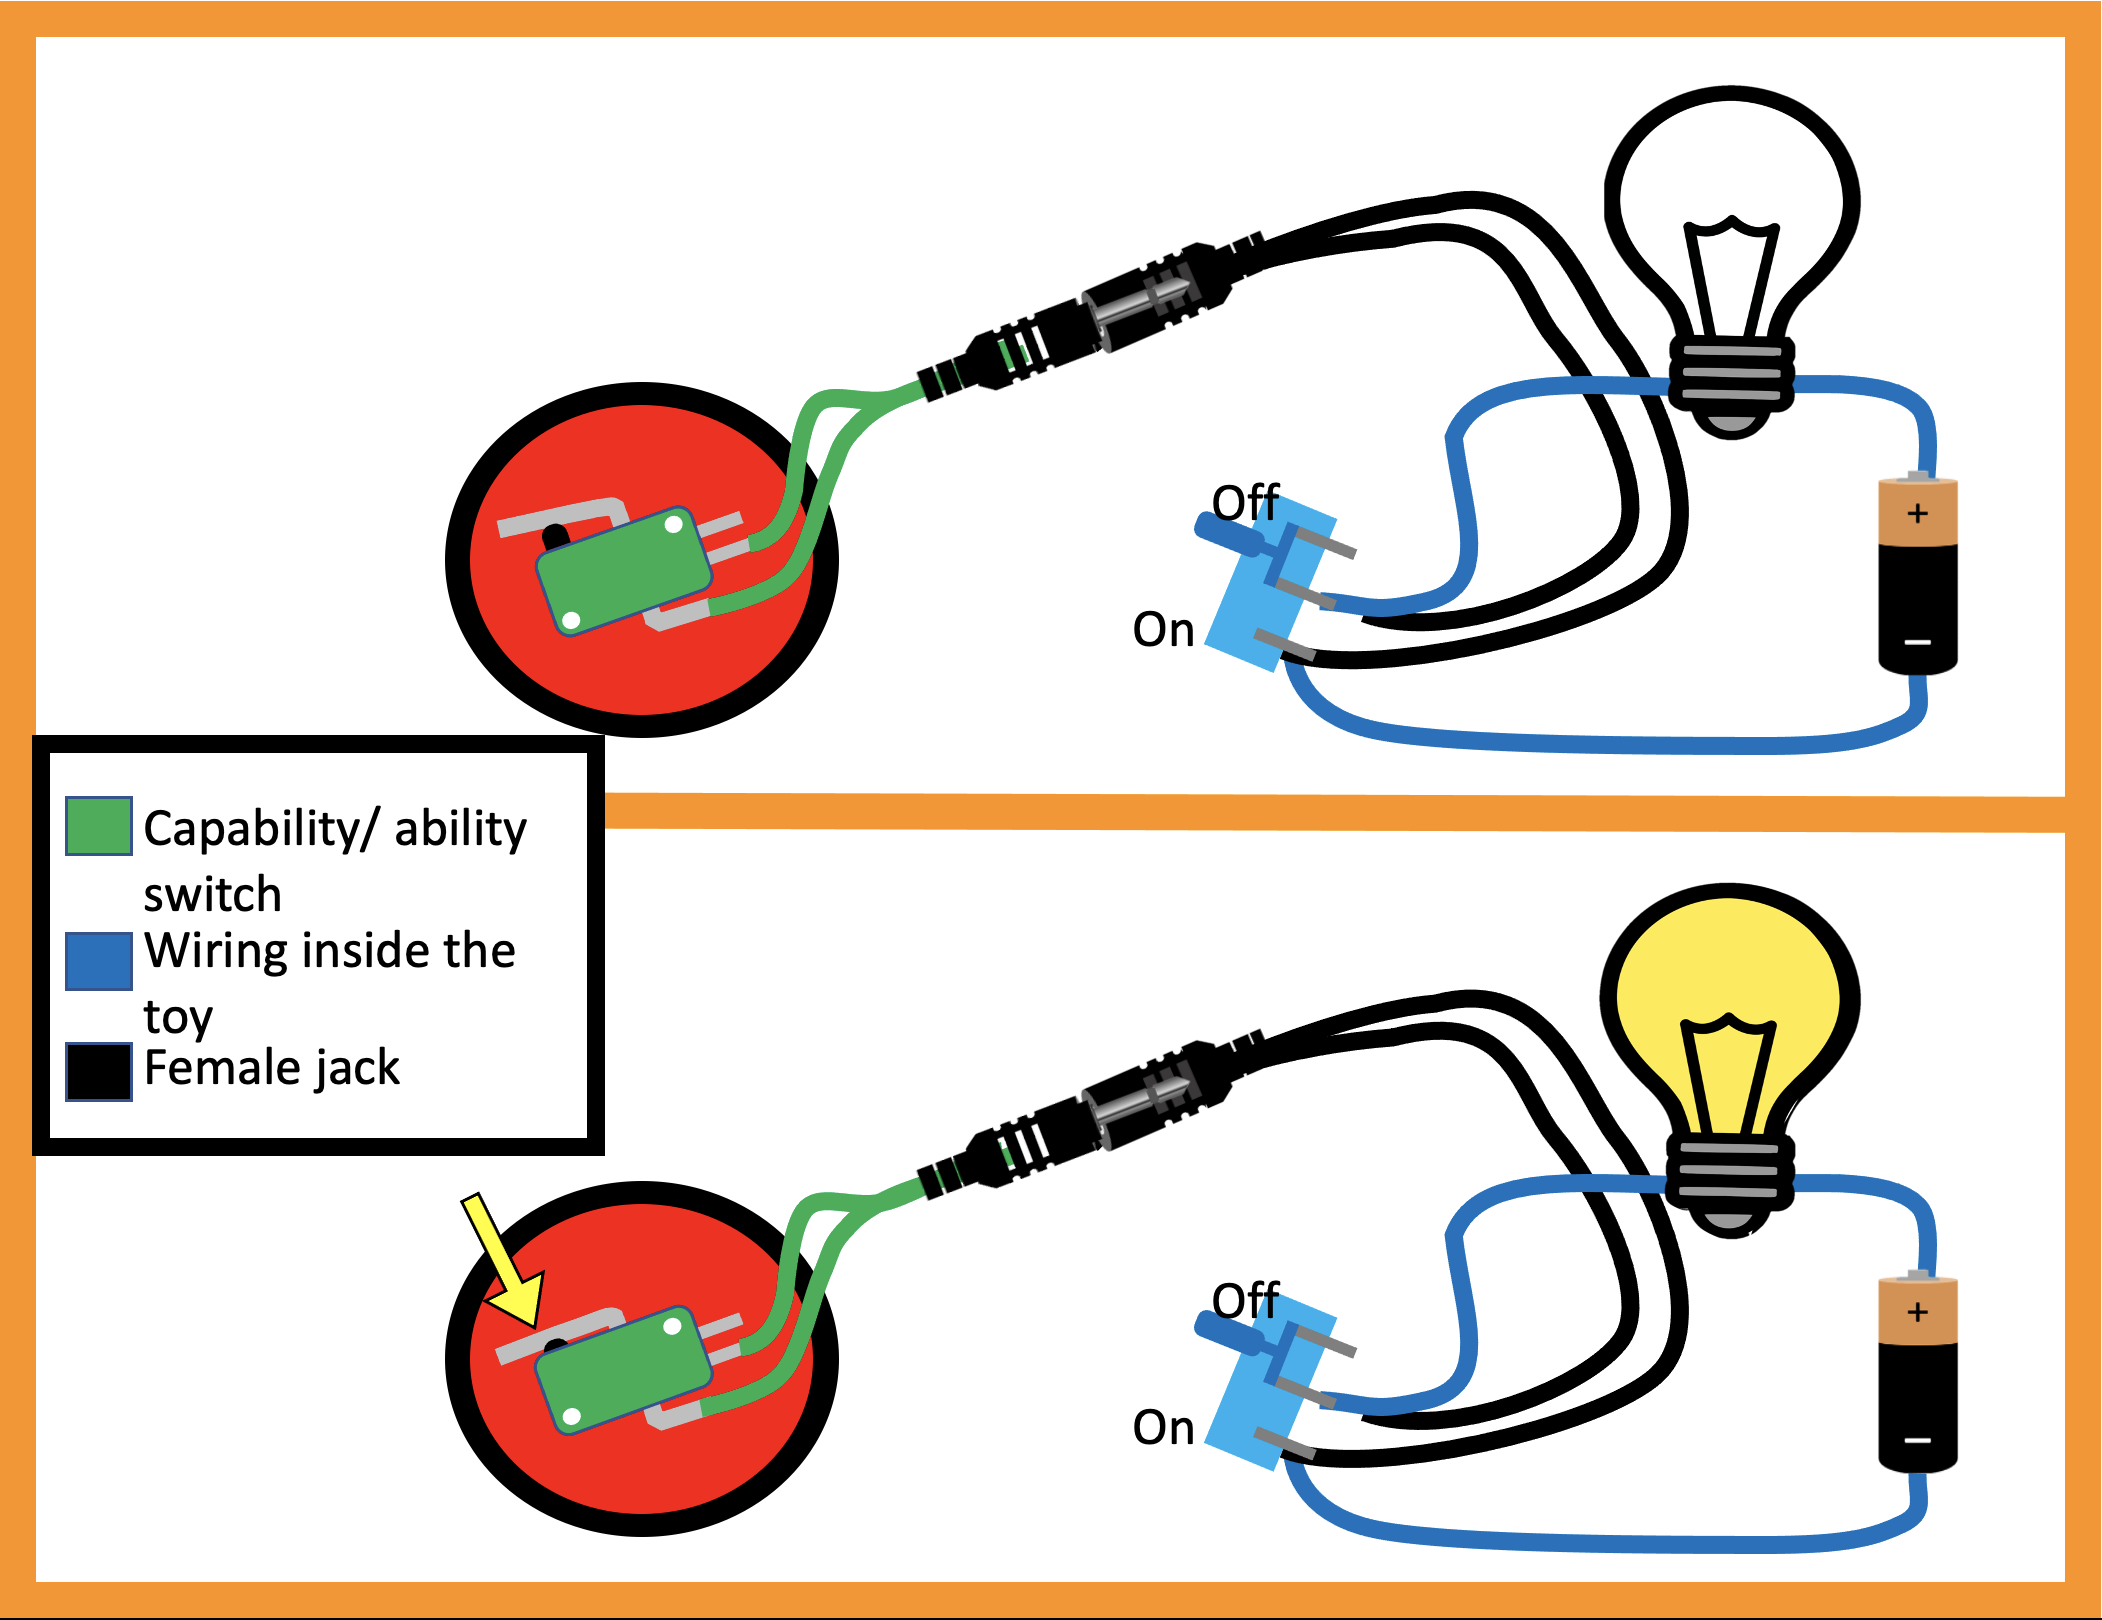
By attaching the female jack, you are extending the wiring of the toy that creates a circuit, making one bigger circuit. It is still an open circuit, because the female jack is internally separating the two wires. When you plug in the male jack, you further extend the circuit using the two wires that connect the male jack to the capability switch. Now when you press the capability switch, you close the circuit and the toy will turn on.
Depending on the type of switch the toy uses, you may need to put the toy in the on or off position for the capability switch to work.
Above I discussed all the important information about electrical circuits and how they interact with switches and capability switches. However, when I first begin switch adapting there was one thing that bothered me - what exactly is going on inside the male and female jacks and the capability switches that allow it to work the way it does. If you are interested in learning more about the internal process click the button below.